如何Root Android Studio AVD
第一篇文章, 由于工作需要用到Android虚拟机, 但是在Mac OS 14上的Genymotion速度奇慢无比, 相比Android AVD速度却惊人的快. 因此才想着如何root掉Android原声AVD, 虽然网上教程很多, 自己也稍微整理了下.
(English version translate by GPT-3.5)
做前
准备工具
首先准备好以下软件
SuperSU-v2.82-201705271822.zip
1
MD5: 8755c94775431f20bd8de368a2c7a179

下载 [官网](http://www.supersu.com/download)  [RuterFu My Storage](https://oss2.ruterfu.com/access/public/2024/01/aLH-8755c94775431f20bd8de368a2c7a179/SuperSU-v2.82-201705271822.zip?sign=96a329ce503370e8e4afac08497a5b9bfd67b97578dedcd)
- eu.chainfire.supersu_v282.apk
1
MD5: 6475e8ec2b286be78ab1d10cae466e40(v2.82)

下载 [官网](http://www.supersu.com/download) [RuterFu My Storage](https://oss2.ruterfu.com/access/public/2024/01/zFL-6475e8ec2b286be78ab1d10cae466e40/SuperSU-2.82.apk?sign=a0101fadec18802a923792240d4087466d3707306d3450b)
- 安装好Android Studio, 并且配置好SDK的环境, 并且能在Terminal中能输入emulator时有有效的运行方式
1
emulator的bin在${Android_SDK}/tools中
- 已经准备好一个AVD, 并且能启动, 能到主界面, 这里用Android5.1_x86_64
准备步骤
- 首先关闭虚拟机, 记住需要root的名字, 例如我这里是RuterDevice API 22, 它的名字是RuterDevice_API_22, 打开Terminal
- 输入 emulator -avd {替换成你的名字} -writable-system, 如果这一步能直接打开虚拟机, 那就跳到
开始Root步骤
1 | $ emulator -avd RuterDevice_API_22 -writable-system |
这里可能出现如情况
找不到这个虚拟机, 返回如下的情况
1
2
3
4
PANIC: Unknown AVD name [RuterDevice_API_22], use -list-avds to see valid list.
ANDROID_AVD_HOME is defined but could not find RuterDevice_API_22.ini file in $ANDROID_AVD_HOME
(Note: avd is searched in the order of $ANDROID_AVD_HOME,$ANDROID_SDK_HOME/.android/avd and $HOME/.android/avd)
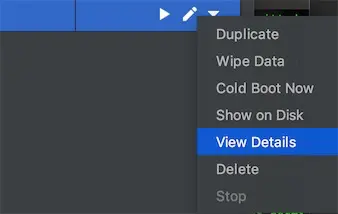
localhost:~ ruter$- 此时表示环境变量没有配置成功, 首先打开Android Studio3, 然后点击那个虚拟机右边的箭头, 点击ViewDetails

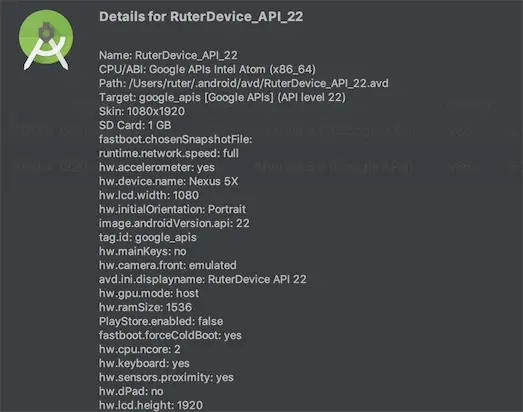
2. 弹出如下的窗口, 记住那个Path, 只需要记到/avd的位置

3. 然后, 编辑 ~/.bash_profile, 增加以下内容, 保存并退出
1
2
3
4
5
6
7
8
$ vi ~/.bash_profile
增加以下内容
export ANDROID_AVD_HOME=/Users/ruter/.android/avd
保存退出, 然后
source ~/.bash_profile
- 找不到emulator/lib64/qt/lib
1
2
3
4
5
6
7
8
9
这个情况下, 切换到${Android SDK目录}/emulator下即可,
然后再次运行
emulator -avd {你的虚拟机名字} -writable-system

出现如下信息即表示成功

emulator: WARNING: System image is writable
emulator: WARNING: encryption is off
WARNING: HAXM 6.0.3 is installed. Please install HAXM >= 6.2.1 to fix compatibility issues on Mac.
- 然后会弹出Android AVD的窗口,
- Command + N 新开一个窗口, 输入adb devices如果看到设备即准备步骤结束
1 | List of devices attached |
开始Root
- 首先, 安装上面工具中的 eu.chainfire.supersu_v282.apk
1 | $ adb -e install eu.chainfire.supersu_v282.apk |
解压上面工具中的 SuperSU-v2.82-201705271822.zip, 内部文件如下所示
将su.pie复制到系统中
1 | $ adb -e push SuperSU-v2.82-201705271822/x64/su /system/xbin/su |
可能出现如下问题
1
2
adb: error: failed to copy 'SuperSU-v2.82-201705271822/x64/su' to '/system/xbin/su': remote Read-only file system
SuperSU-v2.82-201705271822/x64/su:...ed. 44.1 MB/s (100664 bytes in 0.002s)
此时需要运行 adb root, adb remount
1
2
3
4
$ adb root
adbd is already running as root
$ adb remount
remount succeeded
再次运行上面的命令
1
2
$ adb -e push SuperSU-v2.82-201705271822/x64/su /system/xbin/su
SuperSU-v2.82-201705271822/x64/su:...ed. 21.3 MB/s (100664 bytes in 0.005s)
权限更改和生效
运行
adb -e shell进入虚拟机的shell环境运行
su root切换到root用户运行
cd /system/xbin跳到/system/xbin目录下运行
chmod 06755 su更改权限1
2
3
4
5$ adb -e shell
root@generic_x86_64:/ # su root
root@generic_x86_64:/ # cd /system/xbin
root@generic_x86_64:/system/xbin # chmod 06755 su
root@generic_x86_64:/system/xbin #初始化 su
运行
su --install安装su运行
su --daemon&运行守护进程1
2
3root@generic_x86_64:/system/xbin # su --install
root@generic_x86_64:/system/xbin # su --daemon&
[1] 3656打开SuperSU 的app, 此时可能会要求更新, 选择更新然后选择Normal即可, 大约等待1-2分钟, 更新即完成, 点击Reboot即可.
Reboot后, 可以安装一个RootExplore来查看root效果, 可以发现, 已经root完成了
之后如果需要使用root版的avd, 按照上面的 emulator -avd {avd名} -writable-system来启动.


